The Aptos ecosystem continues to expand rapidly, attracting DeFi users, NFT creators, and community-driven token projects. One of the most talked-about meme tokens on the network is GUI. If you are looking to understand how to buy GUI token on Aptos safely and correctly, this guide walks you through the entire process in clear, structured steps.
Whether you are completely new to Aptos or already familiar with blockchain trading, this tutorial explains wallet setup, funding options, swapping, and verification without confusion.
What Is GUI Token?
GUI is a community-driven meme token built on the Aptos blockchain. Unlike short-lived meme projects that appear and disappear quickly, GUI has focused heavily on ecosystem growth, integrations, and airdrops.
Some notable highlights about GUI include:
- Tens of thousands of wallet holders.
- Large-scale community airdrops across NFT and DeFi ecosystems.
- Integrations into various Aptos-native protocols.
- Plans to support developers through ecosystem initiatives.
- Activity across gaming and SocialFi applications on Aptos.
GUI positions itself as a community token that grows alongside the broader Aptos ecosystem rather than functioning as a purely speculative short-term asset.
Now let’s move into the actual process of purchasing it.
Step 1: Set Up an Aptos Wallet
Before buying GUI, you need a wallet compatible with the Aptos blockchain.
Popular Aptos wallet options include:
- Petra Wallet
- Martian Wallet
- Pontem Wallet
- Rise Wallet
Petra Wallet is one of the most widely used options and is beginner-friendly.
To set up:
- Install the wallet extension.
- Create a new wallet.
- Securely write down your seed phrase offline.
- Set a password.
- Ensure you are connected to Aptos mainnet.
Once your wallet is ready, you will need APT tokens to swap for GUI.
Step 2: Fund Your Wallet With APT
You cannot buy GUI directly with fiat. You need APT tokens in your wallet first.
There are two main methods.
Option A: Buy APT From a Centralized Exchange
This is the easiest method for beginners.
You can purchase APT from exchanges such as:
- Binance
- Coinbase
- KuCoin
- Bybit
- MEXC
After purchasing APT:
- Copy your Aptos wallet address.
- Withdraw APT to that address.
- Wait for confirmation.
Transfers to Aptos are typically fast and inexpensive.
Option B: Bridge Funds to Aptos
If you already hold crypto on Ethereum, Arbitrum, Polygon, or other networks, you can bridge assets to Aptos.
Bridging tools allow you to move assets cross-chain. When bridging ETH, it may arrive as wrapped ETH (WETH), which you can then swap for APT on a decentralized exchange.
While bridging is efficient for experienced users, beginners often find direct exchange withdrawals simpler.
Step 3: Access PancakeSwap on Aptos
GUI is available for trading on PancakeSwap under the Aptos network.
To proceed:
- Visit PancakeSwap.
- Switch the network to Aptos.
- Click “Connect Wallet.”
- Select your Aptos wallet.
- Approve the connection in your wallet popup.
After connecting, you can access the swap interface.
Step 4: Add the GUI Token
To avoid fake tokens, always verify the correct contract address before importing GUI.
Official GUI contract address:
0xe4ccb6d39136469f376242c31b34d10515c8eaaa38092f804db8e08a8f53c5b2::assets_v1::EchoCoin002
In many cases, especially with Petra Wallet, GUI will automatically appear once purchased. However, if needed:
- Paste the contract address into the token selection field.
- Confirm the token details.
- Import the token carefully.
Never rely solely on the token name. Scammers can create duplicate token names. The contract address is the only reliable identifier.
Step 5: Swap APT for GUI
Now you are ready to execute the trade.
- In the “From” field, select APT.
- In the “To” field, select GUI.
- Enter the amount of APT you want to exchange.
- Review the estimated GUI output.
By default, PancakeSwap sets slippage at 0.5%, which is typically sufficient for GUI under normal trading conditions. You usually do not need to increase slippage unless liquidity is extremely thin.
Click “Swap.”
Your wallet will display:
- Transaction details
- Estimated gas fee
- Final confirmation
Approve the transaction.
Aptos transactions are extremely fast. In most cases, confirmation happens within seconds, and fees are typically under 0.01 APT.
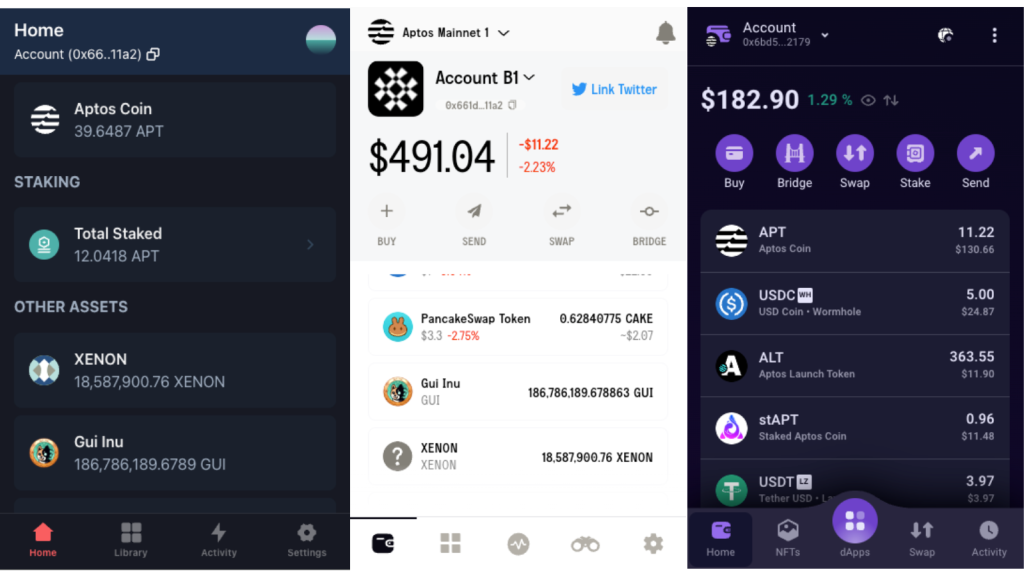
Step 6: Confirm GUI Balance in Your Wallet
After the transaction:
- Open your wallet.
- Check your token balances.
- If GUI does not appear automatically, manually add it using the contract address.
You now officially hold GUI tokens.
How to Track GUI Price and Market Activity
After purchasing GUI, you may want to monitor its price and liquidity.
You can use analytics platforms like DexScreener to:
- View real-time price charts
- Analyze trading volume
- Check liquidity levels
- Track short-term performance
Monitoring liquidity and volume helps you understand volatility and market momentum before making additional trades.
Important Considerations Before Buying GUI
1. Volatility
GUI is a meme token. Like most community tokens, it can experience rapid price swings. Always manage your position size responsibly.
2. Gas Fees
Aptos gas fees are very low compared to Ethereum. Most swaps cost less than 0.01 APT.
3. Speed
Transactions confirm quickly on Aptos, often within seconds.
4. Security
Never share your seed phrase. Always double-check URLs before connecting your wallet. Avoid clicking suspicious links shared in social media groups.
5. Liquidity Awareness
Before buying large amounts, check liquidity levels. Low liquidity can cause higher price impact when entering or exiting trades.
Expanding Your Activity Within Aptos
Once you hold GUI, you may explore:
- Providing liquidity in pools.
- Participating in ecosystem campaigns.
- Engaging with NFT integrations.
- Monitoring community-driven initiatives.
Understanding how wallets, funding, swaps, and verification work gives you a strong foundation for participating in the Aptos ecosystem confidently and securely.


